Some background..
The society of which we live in today puts a great emphasis on the online world and those who are involved whether it be for bad or good. If you open any major newspaper there is a guaranteed headline regarding a database breach or a hacking incident. As we currently live in a world where hacking motives are beginning to emerge each of these headlines have one thing in common; cyber security or a lack thereof. Hackers can play a number of roles, they can be used to isolate and identify vulnerabilities or they can create a route to break in to private and sensitive information. Regardless of the public’s perception of a hacker, I believe that hackers should be used as national resource. In the following paragraphs I will describe Hardware hacking, software hacking, hardware hacking projects and discuss my objective.
Firstly, hardware hacking is known as the modification of an existing electronic source to utilize it in a way that was not originally intended by its developer. As I mentioned before, we constantly read headlines that describes hackers and data breaches; those headlines each refer to what is known as software hacking. Software hacking relates to an individual who utilizes programming skills to obtain access to an unauthorized area. Though society places a high emphasis on software hacking, hardware hacking is also present in society. In fact, hardware hacking began many years ago and served as the gateway to software hacking.
The great American inventor Thomas Edison invented many different products. As we know it, the most profound of his creations is the electric light bulb. How does this relate to hardware hacking? It has been stated that Thomas Edison spent hundreds of hours, many days and many nights utilizing various equipment to create what we now call a light bulb. He tried and tried, time and time again he failed but eventually he found the perfect set up and it finally worked. Two individuals whose work is more modern and are also famous for a hardware hack is Steve Jobs and Woz. Wozniak developed the blue box, which was essentially a device that was used to travel through the phone system using sound. All three of these individuals utilized materials that were made for a specific objective and maneuvered it in a way to be suitable for their own needs which essentially makes it hardware hacking. Were their methods legal or illegal? The answer to that question is unknown. However, each idea was idealized for a good purpose.
In the above paragraphs I discussed the definitions of hardware hacking versus software hacking and gave two examples of hardware hacking. Now, I will explain how an individual can begin to hardware hack buy utilizing specific materials, their benefits and downsides. There are currently two main consumer microcontrollers- The arduino and raspberry pi. The arduino is an open source microcontroller board. It is an embedded electronics platform designed for quickly prototyping an electronics project. It uses a programming language comprising of simple and easy C/C++ functions. Unlike the arudino, the raspberry pi is an extremely sleek and tiny single board computer. It is about the size of a normal credit card and runs on a Linux based operating system called the Raspbian. This board can be thought of as a miniaturized version of the motherboard in your CPU. It might not offer the same powerful processing capabilities as a normal PC, but it gets the job done. The pi is controlled using python programming, which is a bit easier to understand for new people in the industry.
ProjectAimbot..
With my new fascination, a whole sleet of video games came out for the Xbox one around the same time, these titles include Call of duty, Halo, Fallout and Destiny. I personally haven’t touched video games in years, so you can imagine how many times I died in the game causing my team to lose. After losing time and time again, I thought to myself “ There has gotta be something I can do to get better,” with that, came projectaimbot.
My objective was simple; The first objective was to introduce the method of “Thinking outside the box”, I needed to figure out a way to kill the opposite team faster than they can kill me. First variable for that equation would be Trigger Response. Humans are naturally slow compared to anything robotic in a sense. If I had a “robot like” trigger response, I would always shoot first ending in a win for me. After I figured out the variable that I needed to change, next I had to find a way to actually trigger the response for the trigger button. I first came to think of a camera system, but that failed very fast. I noticed in the game when my “crosshair” is on the enemy, it turns red. At last, I figured that I could use that color change in the crosshair trigger response to trigger the shoot button on my Xbox controller. I drew up a couple of schematics, after doing more tear down and researching on the Xbox one controller, I learned that it’s a 5v and the arduino nano is a 3.3v, so a conversion in power had to be made.
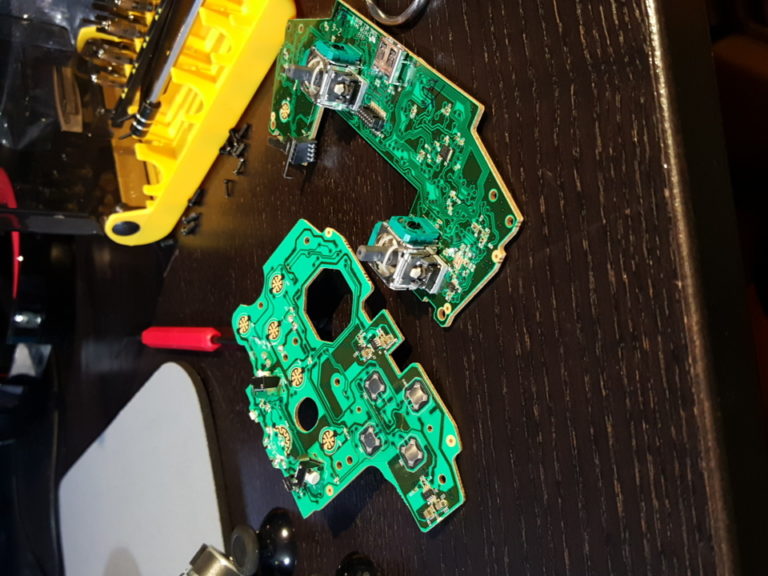
Xbox One Controller tear down..I learned that it’s a 5v and the arduino nano is a 3.3v, so a conversion in power had to be made.

Here is a quick schematic I drew up in gimp. Since the controller runs on 5v, I added a 10k ohm in the ground that connects to the arduino nano, which is 3.3v, the right trigger goes straight to the button.
From here, I had to find the trigger button which is the “Left Trigger” on the controller, the issue with that is on the x-box one controller, it wasn’t easy tapping into the trigger button since it was a touch sensitive trigger and not an actual physical button. A workaround was to change the assigned button to another button, what would have been a trigger button is now on button “B” on the controller, which we can now tap into.

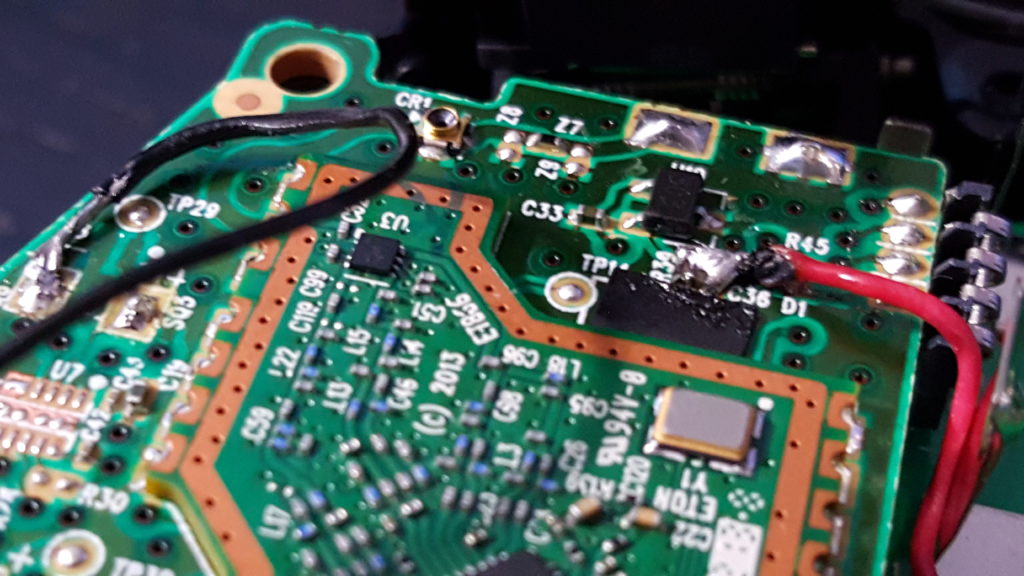
Here I tapped into the right connections, black wire is ground and the red wire goes directly to the button, which will imitate us pressing the button. Not the best soldering I have done, but it got the job done!
After I did a quick test to make sure it worked, time to put the controller back together and solder some extension wires on so it can reach the arduino.
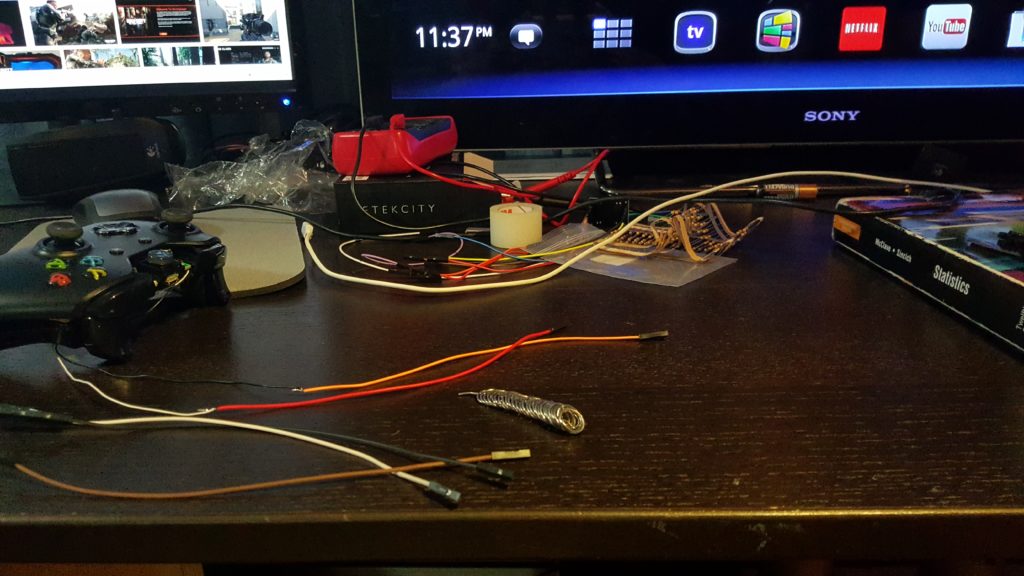
I change the positive red wire for a white one, as I had to re-solder it anyways. Here is a perfect picture showing you my busy desk.
It might be strange to say, but I prefer listening to the random documentaries on Netflix than actually watching it. Painting a picture of a scene in your mind gives you unlimited amount of imagination without sacrificing my full attention. It’s the perfect mix to do two things at once without error. I used my old Statistics book as my tape area, great book btw!
As you see from the picture, the black ground wire goes to orange, the white positive wire goes to red.
RGB Sensor testing..
Testing, testing, and some more testing. I first tried out the RBG sensor, which worked pretty well. This sensor detects red, green, blue and clear color values from object in front the sensor. Red is the color most easily measured. Green and blue are closer in value and can be indistinguishable if the color sample is too far from the sensor. Since we are reading values from an LED TV, we don’t need to illuminate it with a white LED. When I first used this sensor the issue came where it wasn’t “fast” enough. My objective was to make a device that had to be faster than any human can react.
Below are some points where the RBG sensor wasn’t cutting it:
- Wrong Readings: Sometimes it wouldn’t read red if their was slightly more blue on the screen
- False Triggers: If their is yellow, orange, amber.. it would sometimes trigger the arudino causing it to fire the trigger button
- Unnecessary: I didn’t need it to read blue, or green, just red. And it did that at only 70% of the time
- Too Sensitive: If you hold up the sensor in the air, it will always read red. That will cause major issues for this project.
Below is the code I used when I used the RGB sensor if anyone is interested:
//Color recognition TCS230

const int s0 = 8;
const int s1 = 9;
const int s2 = 12;
const int s3 = 11;
const int out = 10;

// Variables
int rCount = 0;
int gCount = 0;
int bCount = 0;

void setup()
{
  Serial.begin(9600);
  pinMode(s0, OUTPUT);
  pinMode(s1, OUTPUT);
  pinMode(s2, OUTPUT);
  pinMode(s3, OUTPUT);
  pinMode(out, INPUT);
  digitalWrite(s0, HIGH);
  digitalWrite(s1, HIGH);
}

void loop()
{
  color();
  Serial.print("R : ");
  Serial.print(rCount, DEC);
  Serial.print(" G : ");
  Serial.print(gCount, DEC);
  Serial.print(" B : ");
  Serial.print(bCount, DEC);
  //Serial.println();

  if (rCount < bCount && rCount < gCount && rCount && rCount < 80)
  {
   Serial.println(" - Red");
   digitalWrite(13, HIGH);
  }
  else if (bCount < rCount && bCount < gCount)
  {
   Serial.println(" - Blue");
   digitalWrite(13, LOW);
  }
  else if (gCount < rCount && gCount < bCount)
  {
   Serial.println(" - Green");
   digitalWrite(13, LOW);
  }
  else{
   Serial.println();
   digitalWrite(13, LOW);
  }
}

void color()
{
  digitalWrite(s2, LOW);
  digitalWrite(s3, LOW);
  //count OUT, pRed, RED
  rCount = pulseIn(out, digitalRead(out) == HIGH ? LOW : HIGH);
  digitalWrite(s3, HIGH);
  //count OUT, pBLUE, BLUE
  bCount = pulseIn(out, digitalRead(out) == HIGH ? LOW : HIGH);
  digitalWrite(s2, HIGH);
  //count OUT, pGreen, GREEN
  gCount = pulseIn(out, digitalRead(out) == HIGH ? LOW : HIGH);
}
As you can see the code is very long..and bloated
LDR Sensor testing..(Winner)
After running into numerous errors with the RGB sensor, I decided to take an “outside the box” approach. I ordered some Photo resistors sensors from ebay. Photo resistors, also known as light dependent resistors (LDRs) or photocells, are low-cost variable resistors where the resistance changes depending on the amount of light hitting its surface. In dark environments the resistance is high; in light environments the resistance is lower. Due to the imprecise nature of photo resistors, they are unsuitable for measuring exact levels of light but are capable of detecting changes.
In short, it measures light (any color of light at once) in a form of DARK and LIGHT arrays. Here’s where out of the box thinking came into play, since it reads ALL light, we only need it to read basically “RED”. From learning photography in my early college days, I remember the use of colored filters when processing images. Went straight to amazon and they sell the filters for average of $10 bucks, great! Essentially, what a filter does is block out any light that is that that color filter, want to only see yellow on your phone? Put a yellow filter over your phone, and only the yellow will be visible, all other colors would dissipate.
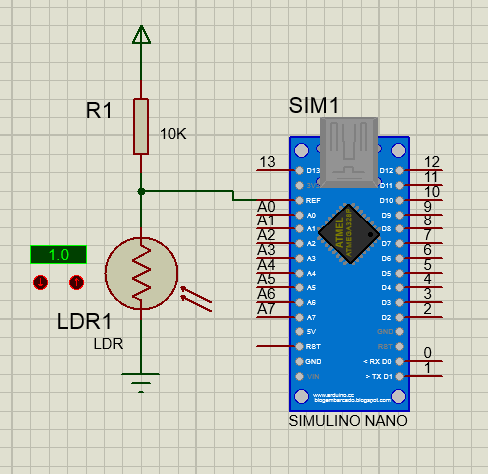
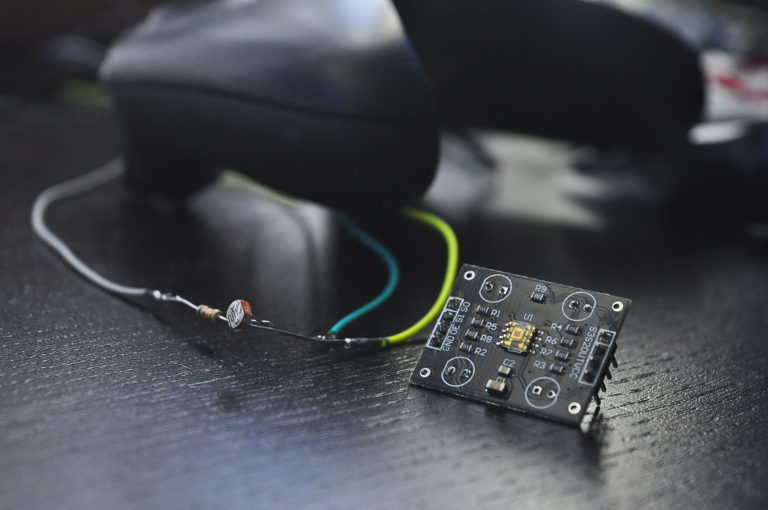
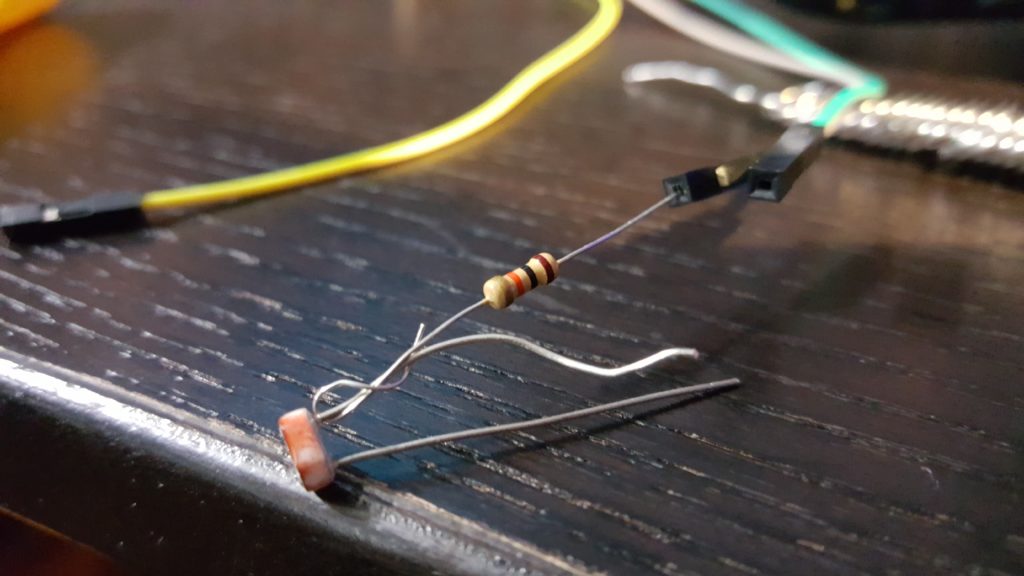
Here is my schematics connections I did, using arduino nano. One wire goes to A0, the other to GND, put an LDR in between them, and put a 10k ohm inbetween A0 and 5v
If you didn’t understand what I said above, here is a visual example of it.
void setup()
{
  Serial.begin(9600);
}

void loop() {

  int sensorValue = analogRead(A0);
  Serial.println(sensorValue);

  if (sensorValue < 420) {
    Serial.println(" SHOOT!");
    digitalWrite(13, HIGH);
  }
  else {
    digitalWrite(13, LOW);
  }

  delay(1);
}
As you can see the code is very short and clean
After connecting everything together, everything worked flawlessly!
First Game: Halo 5
Halo is one of my more favorite games than the rest. With #projectaimbot, it made it that more enjoyable. By default, when putting the cross hair over an enemy, it will turn red. It worked really well in halo, actually a little too good that it started to take the fun away from the game. One game I played I ended up getting 27 kills and 0 deaths.
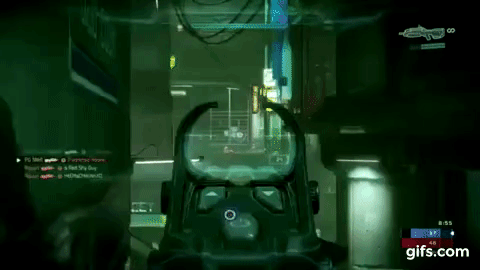
For a slight second, you can see the cross-hair turn red, this is that trigger response I used.
Second Game: Call of Duty: Black Ops 2
After the success on the halo game, decided to dabble in the world of call of duty. A game that I have been personally modding since Modern Warfare 2 (JTAG xbox 360 that I ran online, I’ll post more about that in the end of this blog entry).
Call of Duty, had to take a totally different approach to this game. The issue came where the game itself is more cartoon than realistic, causing red to be everywhere! That book on the shelf in the corner, if your cross hair goes over it, it will shoot, giving up your position in the game. Here comes the “out of the box thinking” again, I decided I need a way to eliminate colors of the game, without affecting it. Call of duty has this feature where you can add attachments to your guns, one of the attachments being “Thermal Sight”, which will make everything in the game BLUE and the enemy Orange/Yellow/Red.
For a better comparison and usage, I ordered an HDMI slitter and split the connection to two of my TVs. Reason why this was sorta needed is that when I connected the LDR to the TV on the left, and with wires hanging everywhere it made it hard to see. So I played on the tv on the right that is clear from all of that.
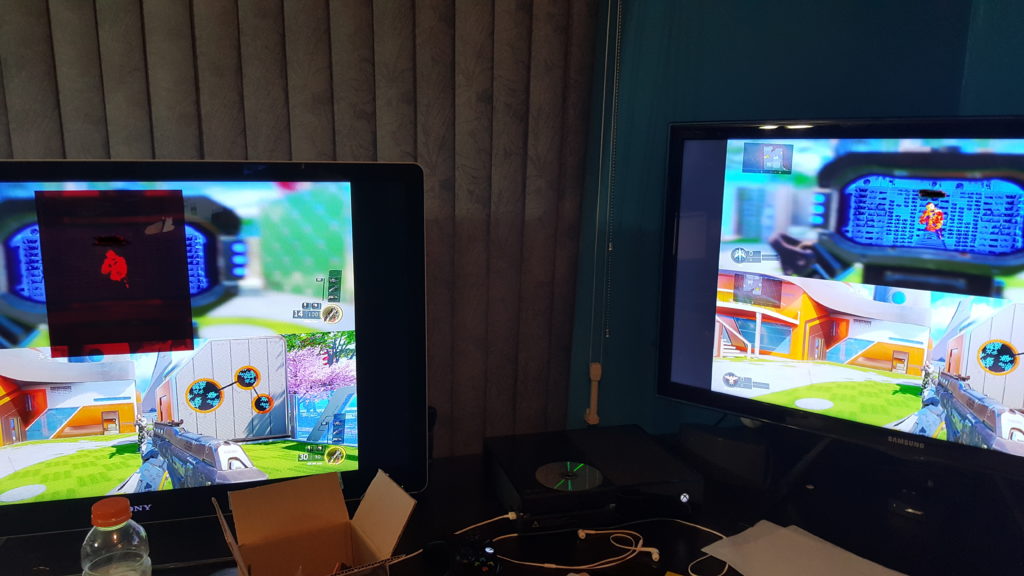
The Left tv shows a perfect red with the color filter on top, Right Tv was the tv I would play on..Don’t mind the clutter!
What I learn..
Companies like Microsoft who designed the Xbox One and so-forth capitalized on individuals who play these games whole-heartedly to win. In doing so, they create and sell different ways that gamers purchase with a hope to “live longer” in the game. Competition is what drives players to keep playing. If projectaimbot is used and known to players in the gaming world then essentially the hardware hack that I created would be a security breach because it would not allow Microsoft to sell the additives to engage players to continue trying to win. Instead, I am able to give players exactly what they want, to always win. Other than Microsoft, this hack will work on any console on the market including the new Sony PS4, on any game (preferably FPS). Simply stated, Projectaimbot like any hardware hack as described in my initial paragraph modified an electronic source to utilize it in a way that was not intended by its developer.
Soon after I finished this project for school, I started working on version two which utilizes the HDMI wire and no sensors needed, very fast accurate read that’s clean. I will always love video games, and don’t want to jeopardize it. That project will get posted when it no longer works for educational purposes only.